Check power, vents, door switch, and heating element first for common dryer faults.
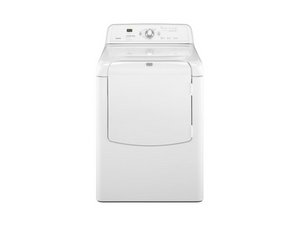
I have worked on ovens, washers, and many dryers for years, and I know the Maytag Bravos Quiet Series 300 Dryer Troubleshooting process well. This guide walks you through clear checks, simple tests, and real fixes for the most common problems with the Maytag Bravos Quiet Series 300 dryer. Read on for step-by-step help, safety tips, cost ranges, and my hands-on tips to save time and money.

Troubleshooting overview and common symptoms
The Maytag Bravos Quiet Series 300 Dryer Troubleshooting starts with knowing common symptoms. Common signs are no heat, no tumble, long dry times, loud noise, and error codes on the display. Each symptom points to a handful of likely causes. This section gives a quick map so you know where to begin.
People also ask (quick answers)
Why is my Maytag Bravos Quiet Series 300 not heating?
A clogged vent, failed heating element, or broken thermostat often causes no heat. Start with the vent and power checks.
Why does my Maytag Bravos Quiet Series 300 make noise?
Noise usually comes from worn drum rollers, idler pulley, or a loose blower wheel. Inspect those parts for wear.
Safety and tools before you start
Always unplug the dryer and turn off the gas (if gas model) before any work. Use gloves and eye protection when handling sharp parts and lint. Keep a small flashlight, multimeter, nut driver set, and a vacuum or vent brush handy. These few tools cover most Maytag Bravos Quiet Series 300 Dryer Troubleshooting tasks.

Step-by-step fixes by symptom
Below are clear, ordered checks and fixes for each symptom. Follow steps in order to save time.
No power or no lights
- Check the outlet and plug for secure connection.
- Reset the circuit breaker or check the fuse.
- Inspect the dryer cord for damage.
If power is fine, a failed control board or door switch may be the cause.
Dryer runs but does not tumble
- Unplug dryer. Check the door switch for continuity with a multimeter.
- Inspect the belt for breakage or slippage.
- Check drum rollers and idler pulley for smooth spin.
Replace worn rollers or a broken belt to restore tumble.
Dryer runs but no heat
- Clean the lint screen and vent path. Restricted airflow causes long dry times and no heat.
- Test heating element with a multimeter. Replace if open.
- Check high-limit thermostat and thermal fuse for continuity. Replace any open parts.
- For gas models, check the igniter and gas valve coils.
Takes too long to dry
- Clean lint filter, inside lint trap, and the vent system.
- Test the moisture sensor (if equipped) and clean sensor bars.
- Verify proper venting to the outside. Long vent runs or bends reduce airflow.
Loud or unusual noise
- Check drum rollers and glides for wear or flat spots.
- Inspect the idler pulley and motor bearings.
- Examine the blower wheel for debris or damage. Replace worn parts.
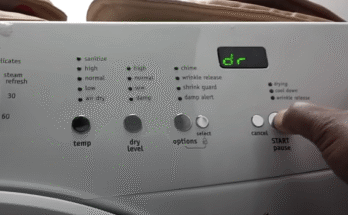
Error codes and diagnostics
1. Note the code shown on the display. Many codes correspond to specific parts.
2. Consult the user manual for code definitions and reset steps.
3. Power-cycle the dryer for a quick test, then proceed to targeted checks.
Testing components and simple multimeter checks
A multimeter helps speed Maytag Bravos Quiet Series 300 Dryer Troubleshooting. Always unplug the dryer before testing.
-
Heating element test
- Set meter to ohms.
- Test element terminals. A very high or infinite reading means a bad element.
-
Thermal fuse and thermostat
- Test for continuity. No continuity = replace part.
-
Door switch
- Press switch and check continuity. No continuity when closed means replace it.
-
Motor and start windings
- Some motors show resistance ranges in the manual. Compare values. Loud humming with no drum spin points to a bad motor or start capacitor.
I once fixed a Bravos 300 that would not heat. The element looked fine but had no continuity. Replacing it fixed the issue in 30 minutes. That small test saved a needless trip to a repair shop.

Maintenance and preventative care
Good maintenance cuts the need for Maytag Bravos Quiet Series 300 Dryer Troubleshooting. A simple routine keeps the dryer running well.
- Clean lint trap after every load. This boosts airflow and cuts fire risk.
- Vacuum inside the lint path every month. Remove trapped lint behind the screen.
- Clean the exterior vent and hose every 6 months or sooner if you notice slow drying.
- Inspect drum seals and rollers yearly. Replace worn parts proactively.
- Use short vent runs and smooth metal ducting to improve airflow.
From personal experience, a clogged vent can double dry time. Cleaning vents once a year lowered my dry times by half. Small chores save big headaches.

Parts replacement, costs, and where to buy
Replacement part costs vary. Below are typical ranges and tips for buying.
- Thermal fuse: $10 to $25. Easy DIY swap.
- Heating element: $30 to $80. Common and simple to replace.
- Drum belt: $10 to $25. Low cost and quick replacement.
- Drum rollers/idler pulley: $15 to $60 each. Replace pairs for best results.
- Motor assembly: $120 to $300. Consider professional help for motor swaps.
- Control board: $150 to $400. Replace only after thorough diagnosis.
Buy OEM or high-quality aftermarket parts for reliability. Keep a photo of the part number and model label to match parts correctly. For Maytag Bravos Quiet Series 300 Dryer Troubleshooting, correct part choice matters.

When to call a professional
Some problems are best left to pros. Call a qualified tech when:
- You see gas smells or suspect gas valve issues. Safety first.
- The motor hums but will not start after belt checks. Motor work is complex.
- Control board faults persist after basic fixes. Board replacement needs skill.
- You lack tools or comfort with wiring and gas systems.
A good technician can run advanced diagnostics fast. If a repair cost nears the price of a replacement unit, weigh repair versus replace.

Frequently Asked Questions of Maytag Bravos Quiet Series 300 Dryer Troubleshooting
Why won’t my Maytag Bravos Quiet Series 300 heat but the drum spins?
Check the vent and lint screen first, then test the heating element and thermal fuse. A blocked vent or open heating component usually causes this issue.
How do I reset error codes on a Maytag Bravos Quiet Series 300 dryer?
Power cycle the dryer by unplugging it for one minute, then plug it back in. If codes persist, note the code and follow the manual’s steps for that code.
How often should I clean the vent for my Maytag Bravos Quiet Series 300?
Clean the vent at least once a year, or every six months for heavy use. Frequent cleaning helps avoid long dry times and reduces fire risk.
Can I replace the drum belt on my Maytag Bravos Quiet Series 300 myself?
Yes. Replacing the belt is a common DIY task with basic tools and a bit of time. Follow a step-by-step guide and keep the dryer unplugged.
What does a loud squeal from my Maytag Bravos Quiet Series 300 mean?
A loud squeal often means worn drum rollers or a failing idler pulley. Inspect and replace the worn parts to stop the noise.
Conclusion
You can solve many Maytag Bravos Quiet Series 300 Dryer Troubleshooting issues with a few checks and simple tools. Start with power, vents, and basic tests before moving to parts. Regular maintenance prevents most problems and saves money. Try the steps here, and share your experience or questions in the comments. If you want more help, consider subscribing for parts guides and repair tips.