Most Whirlpool front-load dryer problems are simple: check power, vents, sensors, and error codes.
I have spent years repairing and troubleshooting laundry appliances. This guide on Whirlpool Front Load Dryer Troubleshooting will walk you through how the dryers work, the most common faults, clear step-by-step fixes, maintenance tips, and when to call a pro. Read on to learn practical, safe, and tested advice you can use today to get your dryer running reliably.
![]()
How a Whirlpool Front Load Dryer Works and why troubleshooting matters
A Whirlpool front-load dryer uses a drum, a heating system, airflow, and sensors to dry clothes. Basic parts are the drum, motor, heater or gas valve, thermostat, moisture sensor, vent, and control board. Knowing how these parts work helps you spot the cause fast when you face dryer trouble. Proper Whirlpool Front Load Dryer Troubleshooting saves time, helps avoid bad repairs, and keeps energy bills lower.

Common problems and quick fixes for Whirlpool Front Load Dryer Troubleshooting
Most problems fall into a few groups: no power, not heating, not tumbling, long dry times, and unusual noises. Below are common causes and simple fixes you can try first.
- No power or no display
- Check the outlet and circuit breaker. Reset the breaker and try a different outlet if possible.
- Inspect the power cord and plug for damage.
- Dryer runs but won’t heat
- Clean the lint trap and vent. Restricted airflow causes poor heating.
- Test the heating element or gas valve; these can fail with age.
- Drum won’t turn
- Check the belt and drum rollers. A worn belt or seized roller stops tumbling.
- Listen for a humming motor; that can mean the motor is stuck.
- Long drying times or hot to touch outside
- Clean vents, lint screen, and the moisture sensor. Low airflow increases dry time.
- Ensure the dryer is not overloaded; small loads dry faster.
- Strange noises or smell of burning
- Remove items like coins or buttons from pockets. Worn bearings or foreign items cause noise.
- Smell can mean lint buildup or an electrical issue—stop the dryer and inspect.
These checks fix many cases of Whirlpool Front Load Dryer Troubleshooting. Start with simple, safe steps and move to parts tests if needed.

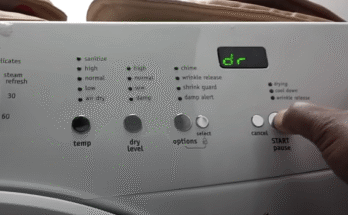
Interpreting error codes on Whirlpool front-load dryers
Modern Whirlpool dryers show error codes for specific faults. Knowing common codes speeds up Whirlpool Front Load Dryer Troubleshooting.
- F01 or F02
- Typically means a control board or memory fault. Try power cycling the dryer first.
- F02E or F70
- Often a communication or motor error. Check wiring and motor connections.
- HE or tE
- Thermistor or temperature sensor issues. Replace sensor if faulty.
- dE or Door error
- Door latch or switch problem. Inspect the latch and alignment.
If the code repeats after power cycle, the part often needs repair. Keep a note of any code for support or technician visits.

Step-by-step Whirlpool Front Load Dryer Troubleshooting guide
Follow these steps in order. They are simple and safe for most home users.
- Visual and power checks
- Unplug the dryer or turn off the breaker before inspecting. Check the cord and outlet for visible damage.
- Clean and test airflow
- Remove lint from the trap. Disconnect the exhaust and look for lint clogs. Run the dryer briefly to confirm airflow.
- Test basic functions
- Run an empty cycle. Listen for the motor and check for heat. This isolates load-related issues.
- Replace easy parts
- Swap the lint filter, check the belt, and clean the sensor. These parts are low cost and often fix common faults.
- Use error codes
- If your dryer shows an error code, use it to focus tests on the control board, motor, or sensors.
- When to stop
- If you smell burning, see smoke, or the dryer trips the breaker repeatedly, stop and call a professional.
PAA-style questions
Why won’t my Whirlpool front-load dryer start?
Check power, the door latch, and the control lock. A tripped breaker or faulty door switch are common causes.
Why is my Whirlpool dryer not heating but tumbling?
Blocked vents or a failed heating element or gas valve usually cause this. Clean vents and test heating components.

Maintenance and care to prevent common faults
Routine care prevents many problems and simplifies Whirlpool Front Load Dryer Troubleshooting later.
- Weekly or after each use
- Clean the lint trap every cycle to keep airflow strong.
- Monthly
- Inspect the vent path and vacuum lint from the blower area if reachable.
- Every 6–12 months
- Disconnect and clean the vent hose and outside vent hood. Replace any crushed or kinked ductwork.
- Yearly
- Check drum seals and rollers. Replace worn parts to avoid belt failure.
Good maintenance keeps your dryer efficient and reduces repair costs.

Safety tips during Whirlpool Front Load Dryer Troubleshooting
Safety is key when working on any appliance. Follow these simple rules.
- Always unplug the dryer or turn off the circuit breaker before working on it.
- Avoid DIY gas valve replacement. Gas work should be handled by a certified technician.
- Wear gloves and eye protection when handling sharp panels or rusty parts.
- Do not run the dryer with lint buildup or damaged venting. That raises fire risk.
Following these safe practices helps you troubleshoot with confidence.
When to call a professional for Whirlpool Front Load Dryer Troubleshooting
Some jobs need trained hands. Call a technician if you see these signs.
- Persistent error codes after resets.
- Gas smell or repeated breaker trips.
- Control board faults or burned electronics.
- Complex motor or belt assembly problems you cannot access safely.
A pro can diagnose electronics, handle gas systems, and ensure safe repairs.
Parts, tools, and estimated costs for common repairs
Simple repairs are cheap. Complex ones cost more. Here are typical parts and ranges.
- Lint filter: $10 to $30
- Drive belt: $15 to $40
- Drum rollers or glides: $20 to $80
- Heating element or gas valve: $50 to $250
- Motor or control board: $150 to $400
Basic tools you need include a screwdriver set, socket set, multimeter, and a vacuum. Prices vary by model and region.
Personal experience and troubleshooting lessons from real repairs
I’ve fixed dozens of Whirlpool front-load dryers. I learned to start with the simplest checks. One device kept failing due to a crushed vent hose hidden behind the dryer. Cleaning the hose fixed the problem instantly. Another time, a dryer showed an error code that only cleared after replacing a worn door switch. My tip: always document what you try, and check vents first. That saves hours and money.
Benefits and limitations of DIY Whirlpool Front Load Dryer Troubleshooting
DIY has pros and cons. Know them before you begin.
- Benefits
- Save money on service calls. Learn your appliance and gain confidence.
- Limitations
- You may lack tools or access to sealed components. Gas and electricity pose risks.
- Practical balance
- Tackle easy fixes. Hire a pro for gas work or complex electronics.
Understanding limits keeps you safe and efficient.
Related concepts: dryer airflow, energy use, and washer-dryer match
Good Whirlpool Front Load Dryer Troubleshooting often links to these ideas.
- Airflow basics
- Dryers need free airflow to dry fast and prevent heat buildup.
- Energy tips
- Clean vents and use sensor dry to save energy and time.
- Washer-dryer pairing
- Overly wet loads from the washer make the dryer work harder. Check washer spin performance.
These related topics help you stop problems at the source and improve laundry results.
Frequently Asked Questions of Whirlpool Front Load Dryer Troubleshooting
Why does my Whirlpool dryer take so long to dry?
Clogged vents or a dirty lint screen reduce airflow and increase dry time. Clean vents and run small loads for faster drying.
What does error code F02 mean on a Whirlpool dryer?
F02 often indicates a control board or memory fault. Power cycle the dryer and if the code persists, seek technician help.
How do I clean my Whirlpool dryer vent safely?
Unplug the dryer, disconnect the vent, and vacuum lint from the duct and the dryer’s blower area. Reconnect and test airflow after cleaning.
Can I replace the dryer belt myself?
Yes, you can replace the belt if you are comfortable removing panels and aligning the drum. Turn power off and follow model-specific guidance.
Is it normal for the dryer to feel hot?
The dryer drum will be warm during use, but excessive external heat or hot exhaust suggests poor airflow or a failing heating control. Inspect vents and sensors.
Conclusion
Whirlpool Front Load Dryer Troubleshooting is mostly about simple checks, clear steps, and safe habits. Start with power and airflow checks, use error codes to guide you, and maintain the dryer to avoid repeat issues. If you smell gas, see persistent codes, or face complex electronics, call a qualified technician. Try the tips here, take careful notes, and share your results or questions below — your feedback helps others and keeps laundry simple.